
As it is known, every device consisting of integrated circuits produces some heat. If this resulting heat is at a high level, we may face all kinds of problems. Temperatures are our primary enemy in all kinds of technological devices, especially computers.
Gaming and business PCs go under heavy workloads to meet high performance requirements. During this process, components such as the CPU and GPU increase their clock speeds, so certain thermal and voltage constraints may be experienced. Not only the hardware gets hot, but also certain components on the motherboard, SSDs and RAMs.
If your cooling system cannot cool the hardware sufficiently, performance decreases may occur, and the devices will restrict themselves until they maintain their effectiveness within the specified thermal range. When temperatures rise to very high levels, malfunctions may occur.
No user wants these scenarios. Today, we will evaluate what you need to do to ensure the best cooling in your computer case. The suggestions focus on the PC case, but some may give you ideas for your laptop as well.
The number, location, and direction of fans can affect overall system performance, noise levels, and your system cleaning cycle. You may not see huge differences in system performance by adding a single fan or changing the orientation of a fan, but there are still some things you can do to get the best experience. Optimizing cooling performance will always be to your benefit.
Whether you overclock or not. We’ll list methods for PC airflow to keep noise levels low and improve cooling/system performance.
Basic Issues
Whether off-the-shelf or retrofitted, some computers come with a small number of fans. Some cases even have only an exhaust fan. The exhaust fan is important, but in such cases, not enough cold air enters the system. The fan at the back is also insufficient to expel the air inside when temperatures rise. In such cases, thermal restriction, which we call “thermal throttling”, may occur.
Even if there are enough cooling fans in the case, some users may make mistakes during assembly. We will discuss this issue in detail.
We recommend that every computer have at least one exhaust fan and one air intake fan. Ideally, the intake fan should be a little more powerful to ensure you have positive pressure. But this is a small detail. It is important to have an inlet and outlet fan.
Positive Air Flow
What do we mean by positive air flow? The potential for fans inside your system to bring more cool air in after expelling used air from the system. A positive cooling cycle is created and that’s what we’re aiming for.
Negative air pressure is when more air is expelled than is taken in; It creates a potential vacuum that could start to suck back in hot air that has been expelled, or it could cause fans to work too hard to suck air inside the system, adversely affecting the components inside. Equal air pressure means a balanced inlet and outlet cycle. We want positive or at least balanced air pressure in our case.
Although in theory negative airflow is intended to be the most effective cooling mechanism that expels more heat than it absorbs, vacuum can be problematic in this scenario and it is difficult to maintain negative airflow when such a vacuum occurs. Positive airflow is practically what you want to achieve to ensure that more cold air is drawn in and circulated around the heating components for optimized cooling.
The most important thing when it comes to your PC or overall temperatures is airflow. You can choose positive airflow or balanced airflow. However, fresh air must enter the case and hot air must somehow escape from the PC case.
Now, without boring you too much, let’s move on to the important information.
Computer Placement
Hot air needs to be circulated in some way to distribute it around and draw cooler air into the system. Some fans in your system (usually the ones at the front) are responsible for directing cool air in. The fans at the back generally serve as exhaust to remove the heated air inside the system.
This cycle will operate continuously to cool your system, but if your computer is in a hot, enclosed and confined space, this setup won’t do much good. Your system will basically circulate hot air around the components, resulting in poor cooling. It is important to keep busy devices in a cooler room and location. It is also generally better to have it in an elevated position.
In summary, allow air flow. The easiest thing you can do to help your PC stay cool is to give the case some breathing room by removing obstructions to airflow. Make sure there is nothing obstructing any side of the computer, especially the back. Most of the hot air is exhausted from the back of the computer case.
Make sure the enclosure is not blocked and the back is completely open and unobstructed. If the computer is in a closed area of the desk, you may also want to consider relocating it. In such a case, hot air is recycled inside the table and gets hotter as the computer works.
Component Selections
Want better cooling performance? Think more broadly when choosing your system components. You may have a little deficit in your budget, but it will be worth it in the long run.
For example, think about the future when buying a processor cooler. If you have the chance to overclock in the future, invest in a better product. When buying a graphics card, you can choose a model supported by a good cooler.
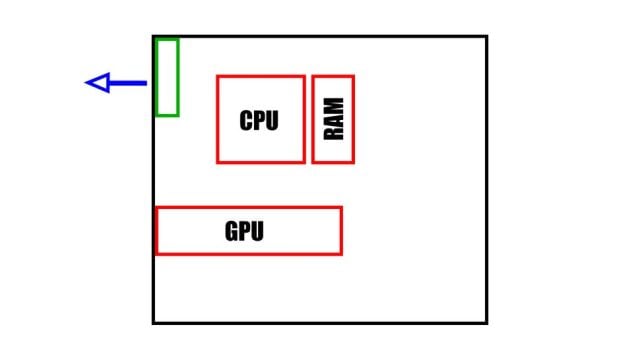
System Structure, Circulation and Cables
Before discussing cooling techniques, let’s take a look at the basic structure of the system. The cooling cycle will work better in a large and spacious area with gaps between components and well-wiring. It needs to have a clear path for air to flow through the device without any obstruction. Trapping heat within the system causes the components inside to heat up.
One of the biggest mistakes most people make when it comes to PCs in general is that they get too messy, especially when it comes to cables. Clutter inside the case may not have a serious impact on temperature, but it can restrict airflow too much. It can create problems without you realizing it and is something you should definitely avoid.
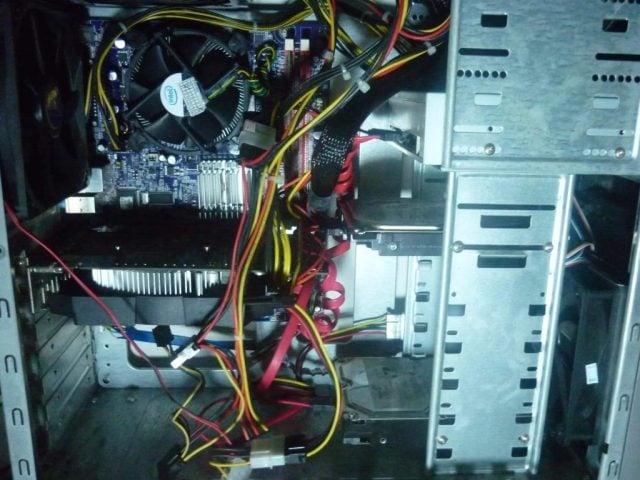
Take half an hour for your PC without getting too lazy. Gather the scattered cables together to make the interior of the case more spacious.
However, certain graphics cards are produced to be efficient on certain systems. NVIDIA and AMD use single radial fans that send hot air out of the system via the card’s heat sinks and GPU IO. Other multi-fan GPUs circulate hot air away from the GPU itself but do not exhaust it completely from the system, instead waiting for the fans in the CPU cooling to exhaust the hot air.
Choosing SSDs instead of bulkier HDD drive bays also frees up space in the case. This will ensure better air circulation within the case, increasing SSD speeds (at least in some cases).
How to Choose a Fan?
Before we explain how to position your case fans, let’s take a look at some basic terms and some things you need to know.
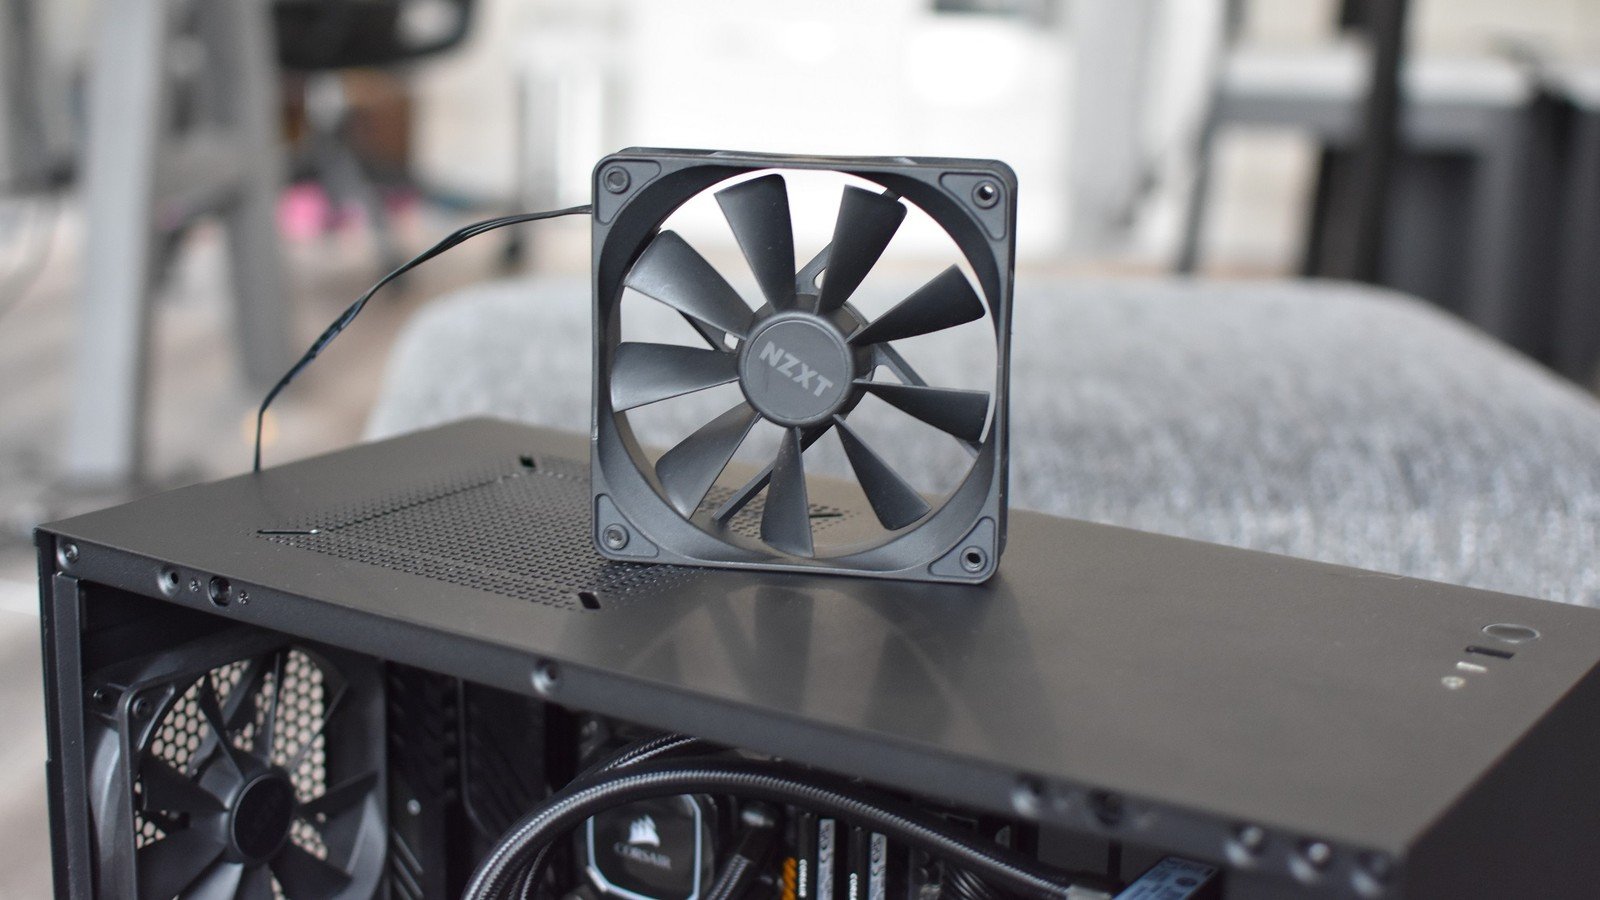
Fan Size
Fans come in a wide variety of sizes, but we commonly see 120mm and 140mm fans. The advantage of a larger fan is that it can move the same volume of air at a lower RPM, thus reducing fan noise. Meanwhile, you cannot install fans of all sizes in every slot in the case. You can check the specification sheet or physically inspect the case to see what sizes the case supports.
CFM and RPM
The volume of air a fan can move is measured in Cubic Feet Per Minute (CFM). This number can vary greatly depending on fan size, RPM, and how it balances noise levels, but a “good” case fan typically outputs more than 50 CFM.
Rotations Per Minute (RPM) indicates how fast a fan rotates. The higher the RPM, the more air moves; but these high speeds come at the cost of noise, usually measured in decibels (dB).
Noisy
A fan that spins extremely fast has a more powerful motor and produces more vibrations that you will hear when using your computer. If fan noise bothers you, try to find a fan below 30 dB.
There are several factors to consider when it comes to fan selection: size, speed and airflow, and static pressure. If we remember the basic concepts of rotation and linear motion, we know that larger blower fans provide more linear displacement for the same RPM or angular motion. Larger fans are also quieter and may be preferred if they fit in your case.
When it comes to fan speed, a balance must be struck between noise and heat. Faster fans can circulate air faster, providing better cooling and heat dissipation to your setup. On the other hand, slow fans are quieter and do not create noise that will give you a headache.
Static pressure fans are designed for use in more restricted airflow areas where they can effectively push or pull air within the structure of your system. Airflow fans are more effective on the outside to provide stronger air extraction around the edges of your installation. Static pressure fans are rated for static pressure and can be purchased based on the force you need in these areas to circulate air around the system. Airflow fans, on the other hand, are quieter fans and allow general heat to be removed from your setup to the outside environment.
When buying a case fan, try to find the best balance of CFM and dB that fits your budget. You can withstand loud noise like a jet engine coming from the fans for a while. Choose a product that can move air adequately without making too much noise.
Another option is to add more or larger fans to your system. Since more than one fan and those with larger blades can carry more air, the noise level will be lower.
PWM Control
Consider PWM controlled fans if your motherboard or fan controller supports them. PWM fans provide precise speed control, which can help balance airflow and noise levels.
Static Pressure etc. Normal Airflow Fans
Let’s take a look at static pressure fans and compare them to average airflow fans:
| Static Pressure | Normal Airflow |
|---|---|
| The force exerted by a fan to move air through obstructions. | The volume of air moved by a fan without significant obstruction. |
| Higher static pressure allows fans to move air through obstructions. | Normal airflow provides consistent unobstructed cooling in open areas. |
| Fans designed for high static pressure generally have steeper fan blades and higher RPMs. | Fans optimized for normal airflow have wider blades and lower RPMs. |
| Radiators are ideal for overcoming constraints in densely packed systems or obstructed areas. | Suitable for general cooling needs without significant obstructions. |
Build Quality and Aesthetics
Try to look for fans of at least some quality for longevity and reliability. Similarly, look for fans that will fit your PC case. Even if it is not RGB illuminated, harmonious colors are important for aesthetics.
Which Direction Do Fans Blow?
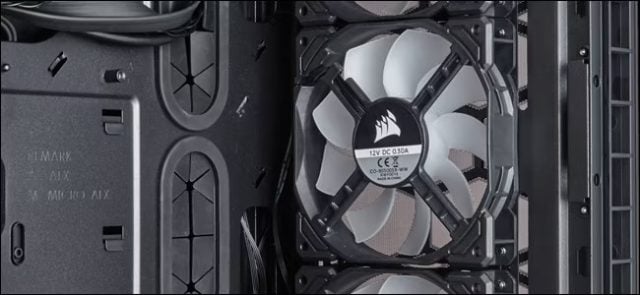
Like every fan, the fans on your computer have input and output sides. If you’re not sure which is which, check for a small arrow on the side of the fan. Manufacturers often place this symbol along one edge of the fan to indicate the direction of airflow. If this sign is not present, you can use your hand to feel the direction in which the air is moving. Often the brand label is also on the entry side because it is more likely to be visible through glass or mesh side panels.
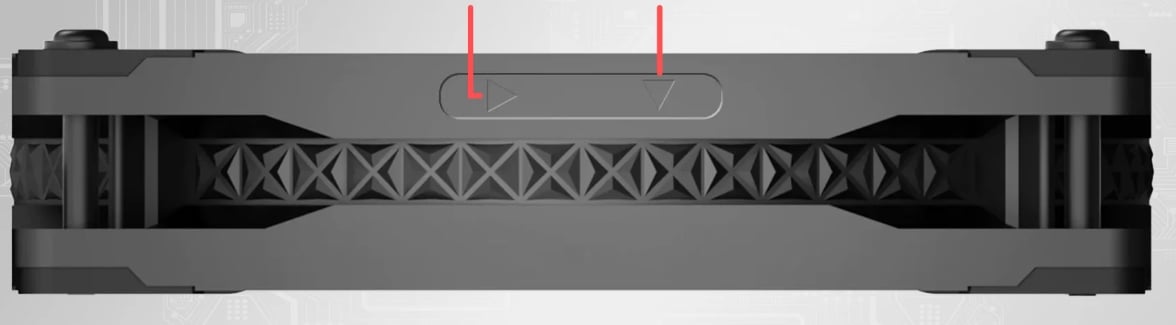
Arrow indicators on the fans show the direction of air flow. In other words, the arrow direction is the direction in which air moves inside the fan. If your fan has two arrows; The arrow pointing to the right or left indicates the rotation of the fan blades, and the arrow pointing up or down indicates the direction of airflow.
Or, you can hold a piece of paper in front of the fan to see if the paper is blown up or pulled towards the fan. If your computer is not actively working, there is another method:
Fortunately, this isn’t the only way to control which direction the fan blows. Another simple way to check which direction your PC fans are blowing is to examine the fan blades. If your fan does not have an arrow indicator or is already installed, look at the direction of the blades.

If the fan blades are curved away from you, you are facing the intake side. Technically, the suction side is the convex side of the wings. However, if the blades curve towards you, resembling a bowl shape (i.e. you are looking into the bowl), you are looking towards the exhaust side (i.e. the fan is blowing air towards you).
Although there is a CPU fan brand label in the middle of the exhaust side, this may not always be the case.
How to Install Fans? Which Direction Should You Look?
Case fans are very easy to install. You’ll see mounting points on the front, back, top, bottom, and sometimes even the sides of your case. Each case supports specific fan diameters (usually 120mm and 140mm), so make sure you get the appropriate fans.
During installation, we place the fan in the case, align it with the mounting holes, and screw in four individual screws to hold it in place. Then we connect the power cable to the matching fan header on your motherboard (and to the RGB header if your fan has customizable RGB lighting). Removing the fan is also very simple if you follow these steps in reverse.
Now let’s get to the real deal: You need to pay close attention to your computer’s airflow. You can have very expensive fans with the highest speeds, but if they are not installed correctly and the fans blow in the wrong direction, you may even see more harm than good.
If the case cannot get enough cold air, or if the hot air inside the case is trapped inside due to improper installation, the performance of the CPU and GPU, and even the SSD, will decrease due to thermal throttling. As we said, components can also be damaged if care is not taken.
Ideally, you need two intake fans to blow cool air into your case. Hot air circulates around your components, allowing the hot air to rise and exit the case through the exhaust fan(s).
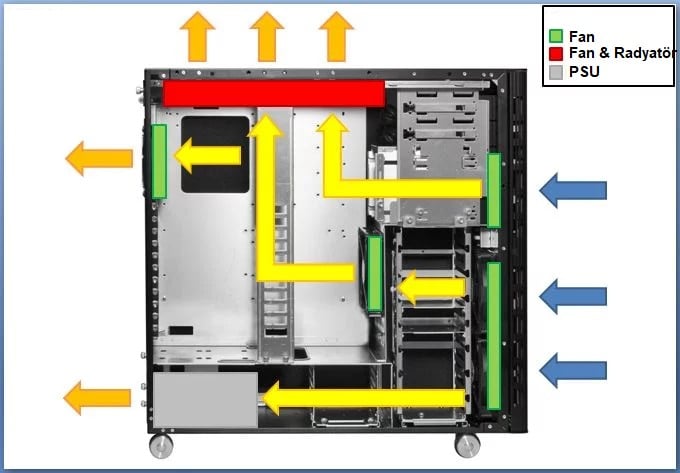
The general air flow of your case should be as above. Front fans should take in fresh air and distribute it inside. The fans (or radiators) at the back and top of the case should be adjusted to remove the air from the case.
Another important aspect of PC airflow is air pressure. Neutral, positive or negative depending on the input and output quantity it could be. Now let’s look at the most ideal fan shapes for different case configurations.
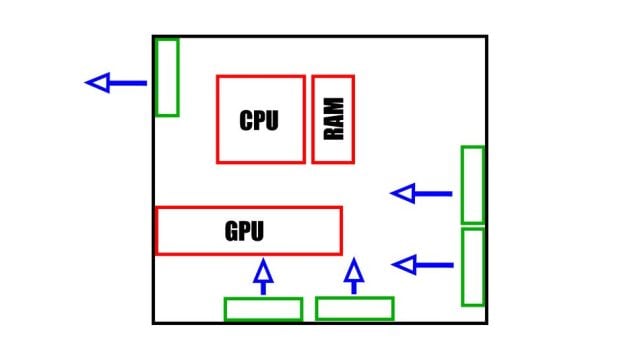
Fans Positioned at the Front, Back, Top and Bottom
In this configuration, the front and bottom fans draw air into the case, while the top and rear fans expel hot air. This creates a clear air channel throughout the computer’s core components, while also providing additional cool air directly upwards. It’s a similar scenario to the traditional front/rear air configuration we mentioned below, but air volume is added to increase the flow rate. This scenario delivers cool air directly to the GPU and pushes that air upwards towards the CPU and exhaust fans.
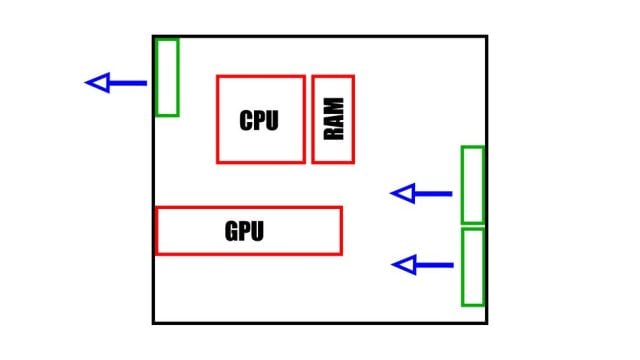
Fans Positioned at the Front, Back and Bottom
We can say that this fan arrangement is the same, but the air is thrown out with a single exhaust fan. If there is no fan slot on the case, this is the best way to mount it. If there were fans in the upper section, cooling would of course be more successful. If you are considering this configuration and have more than one case fan at the bottom of the computer, move the fan to the top of the case for best cooling.
Fans Positioned Only in the Front and Back
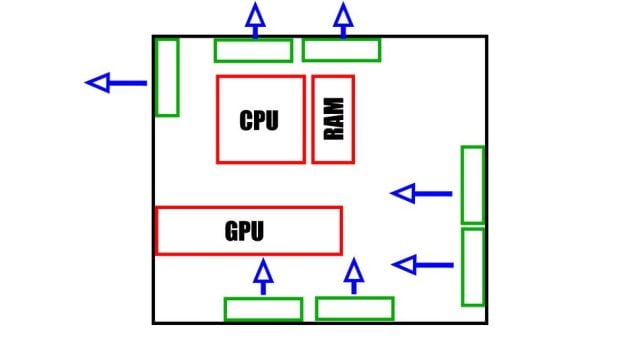
This is the most common cooling configuration, and most PC cases with multiple fans come this way. While the air taken from the outside is drawn through the front panel, it is directed directly to the motherboard. Thus, cool air reaches the GPU and CPU. The hot air is blown into the duct of the exhaust fan, creating a flow from front to back. As a side note, if the front of your case isn’t providing much airflow to your intake fans, this option may not work as well as it should.
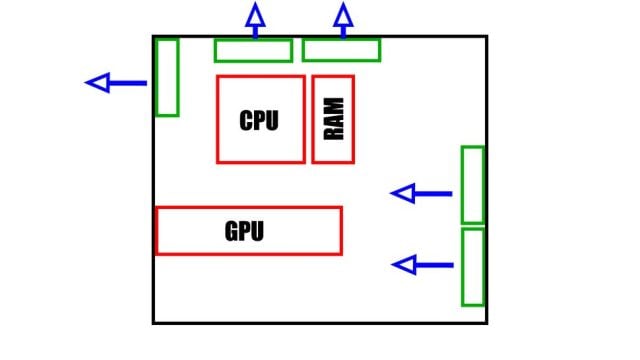
![]() Fans Positioned on the Front, Back and Top
Fans Positioned on the Front, Back and Top
 Fans Positioned on the Front, Back and Top
This fan configuration is all about pulling air through the case. It may be less effective than a front, rear, and bottom fan configuration because it lacks the upward thrust provided by a bottom case fan. This setup is effective if the front fans are powerful enough and enough air can be taken in.
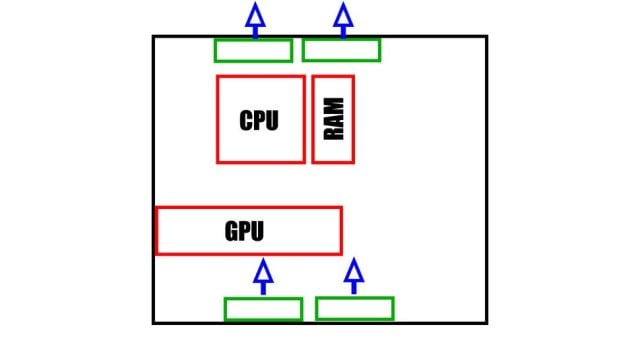
Fans Positioned at the Top and Bottom
This configuration is not very common today, in fact it is almost never used. However, it is an option that can be useful in cases where it is not possible to mount front and rear fans. Fans draw air from the bottom of the case, blow it upwards across the motherboard, and expel it out the top of the case. A viable option for vertically mounted GPUs, as graphics cards installed directly into the PCIe slot (when the motherboard is mounted in a standard orientation) can block cool air flow from reaching the CPU.
Rear Fan Only
Some PC cases, especially very cheap ones, come with a single fan. This is inefficient and a bad option. It should only be preferred on computers that have very low segment hardware and do not get hot. Without a cold air source, components quickly become very hot. Air movement is minimal in this setup and if there is space up front, get another fan if possible.
Front Fan Only
If the only fan available is located only on the front, cooling performance will be worse. With a single front fan, cold air is drawn in and trapped inside since there is no exhaust fan to throw the air out. The air temperature increases and this warm air naturally waits until it moves out of the case.
If you only have two fans, install them front and back. If you have three fans and an external graphics card, you’re better off placing them on the front, back and bottom of your case. For additional fans, consider the layout of your components, any cables or structures that might obstruct airflow, and position your fans so that they draw air in from the bottom right (front) and flow to the top left (back) of your case.
Liquid Cooling
If you’re using an all-in-one CPU cooler, it already comes with fans out of the box, which should be mounted in the manufacturer-recommended location. Special, high static pressure fans are used to pass the special liquid cooling family through the narrow fins of the radiator. However, there are certain fan arrangements that come with coolers.
Radiator Location is Important
The cycle of the all-in-one cooler does not use 100% liquid cooling. There is always air in the circulation loop. Air remaining in the water pump may cause problems such as reduced noise and thermal efficiency, and may also negatively affect its lifespan. In this context, it is very important to prevent air from collecting in the pump or in a place that will affect thermal efficiency.
Mounting on the Bottom of the Case
Here we will look at the differences as we go into detail about different radiator positions. Let’s start with the mounting at the bottom of the PC case. In such a case, air will accumulate in the water block. The pump will produce a lot of bubbles during operation and reduce heat transfer efficiency. Therefore, this is not a recommended configuration.
Pros
- For some mini-ITX cases, this is the only option.
Cons
- Efficiency in terms of heat dissipation is at a low level.
- Liquid cooling life is lower.
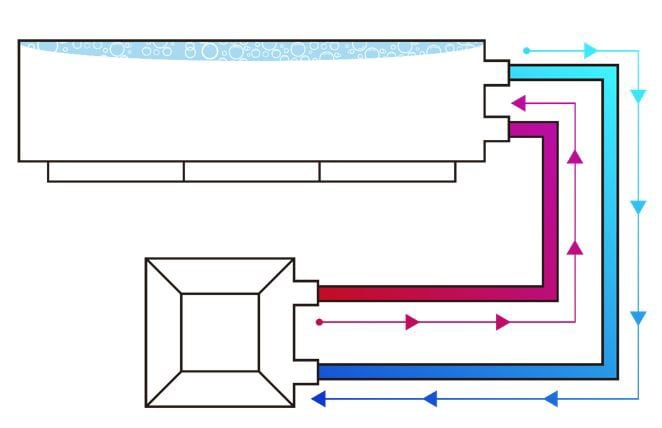
Top Mounting
When you install the radiator on the upper part of the case, you will be less affected by the air accumulation problem. Air in the AIO system will accumulate at the top of the radiator, which does not fundamentally affect the flow of coolant in the system and does not reduce thermal efficiency.
Mounting on the top is the most recommended method in terms of thermal performance. However, in some cases there may not be enough space to install a 360 mm or 280 mm radiator.
Pros
- Good thermal efficiency.
- Longer lifespan for liquid cooling.
Cons
- In some cases, there may be a mechanical compatibility issue.
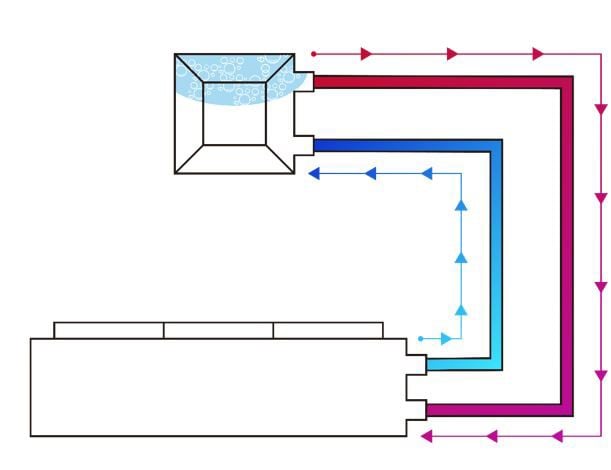
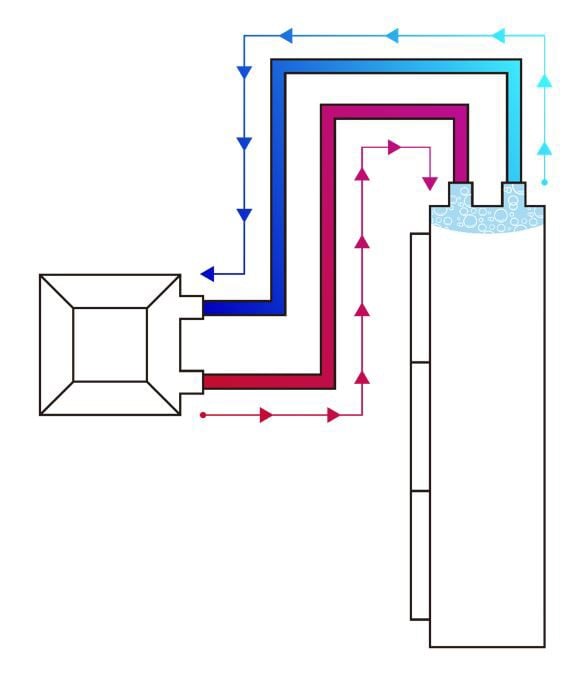
Front Panel Mounting: Pipes Downward
As a third option, you can mount the radiator on the front of the case. In this case, you need to bring the direction of the pipes up or down. When the pipes are set to point downwards, air will collect at the top of the radiator. So the water pump will not be negatively affected. According to the tests, the lowest CPU temperature was achieved with this method.
Pros
- Efficiency in heat dissipation is at a high level.
Cons
- In some cases, compatibility problems may occur.
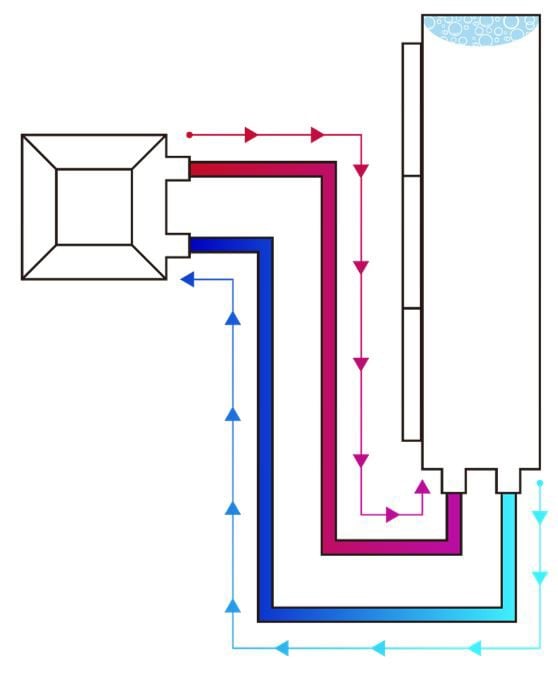
Front Panel Mounting: Pipes Upward
When the pipes are positioned upwards rather than downwards, air may accumulate at the entrance of the radiator. Thus, cooling efficiency may decrease and indirectly heat dissipation efficiency may decrease. However, if your options for cooler installation are limited, you can position the pipes facing upwards.
Pros
- It’s a good option as far as the PC case allows.
Cons
- It is not the best option when it comes to heat dissipation.
Liquid Cooling Tests
Now let’s look at the temperature tests performed with 12 different configurations. As we just mentioned, Best thermal performance for processors It is achieved when the pipes are adjusted to face downwards and the radiator is attached to the front of the case. With the pipes on top the temperatures are still good, but slightly worse than the first method. As a result, you can use both methods.
| Exhaust Fan: Out | Up Mounting | Front Panel Mounting (Pipe on Top) |
Front Panel Mounting (Pipe Below) |
| Radiator Fan: Exhaust System Fan: In |
CPU: 87 ºC GPU: 73 ºC |
CPU: 94.1 ºC GPU: 79.8 ºC |
CPU: 85.3 ºC GPU: 75.3 ºC |
| Radiator Fan: Exhaust System Fan: Exhaust |
CPU: 93.3 ºC GPU: 72.3 ºC |
CPU: 93.3 ºC GPU: 73.3 ºC |
CPU: 95.1 ºC GPU: 73.4 ºC |
| Radiator Fan: Inside System Fan: In |
CPU: 90.3 ºC GPU: 77.8 ºC |
CPU: 91.5 ºC GPU: 80.8 ºC |
CPU: 89.9 ºC GPU: 78.8 ºC |
| Radiator Fan: Inside System Fan: Exhaust |
CPU: 87.3 ºC GPU: 81.2 ºC |
CPU: 87.8 ºC GPU: 77.1 ºC |
CPU: 82.4 ºC GPU: 74.4 ºC |
What Can Be Done for Air Flow and Adequate Cooling?
You can take the following measures to improve airflow and optimum cooling performance in your computer:
- Clean Components: Dust accumulation on components may obstruct airflow. Therefore, regularly clean your computer case, fans, and coolers using compressed air or a soft brush to remove any dust or debris that may be blocking airflow.
- Efficient Cable Use: Arrange and route cables properly to avoid obstructing airflow paths. Secure cables away from fans and components using cable ties.
- Remove Obstacles: Remove unnecessary components, drive cages, or obstructions that may block the air path inside the chassis. Remember, more space is always better.
- Well Planned Fan Placement: Make sure you have the appropriate number of fans and position them strategically for optimum airflow. We have already covered this topic in detail. Intake fans should bring cool air into the case, and exhaust fans should take hot air out. Consider adding fans to areas prone to high temperatures, such as near the CPU or GPU.
- High CFM Fans: You can replace your fans with fans designed for high air flow without making too much noise. These fans can move more air and increase overall cooling efficiency.
- Fan Filters: Install dust filters at the intake fan locations to prevent dust from entering the chassis and clogging the components. Clean these filters regularly to maintain optimum airflow.
- Case Cleaning: Although many people are not aware of it, dust and dirt cause our computer to run hotter than it should. If you want to keep your computer as cool as possible, clean your case thoroughly regularly and make sure there is no dust. The most common places where dust accumulates are the fan blades, radiator, and power supply. It would be beneficial to clean the entire case, especially these.
- Thermal Paste Replacement: Depending on the quality of the thermal paste, you do not need to change it frequently. However, when the thermal paste loses its conductivity and dries completely, components such as the CPU and GPU start to run hotter. If you are using a very poor quality product or have not changed it for a long time, it would be beneficial to get your hands on thermal paste. Thermal components lose their functionality within one or several years, depending on their quality. Therefore, if you notice that the temperature is increasing even though everything is under control, you should check the thermal paste.