

We often forget that in today’s world the main users of computer systems are humans. As humans, we are not perfect in terms of our ability to reason and our ability to accurately perceive the physical world. In this respect, some programmers realized that computers do not need to be perfect in everything they do. As a result, the JPEG format was found. They discovered that using approximate calculation techniques or heuristics can also provide a good experience.
Humankind produced the JPEG image compression standard, which is a good example of this balance between perfection and imperfection that I mentioned. JPEG is a widely used format for images and is considered a marvel of engineering and science. By combining various technical building blocks and concepts so that the image it compresses is efficient, even if it is not perfect It has become a popular and established format for surface images.
JPEG is a method used to reduce the size of image files while keeping them visually acceptable. It does this by striking a balance between file size and how good the image looks. At the beginning of the article, I mentioned that we were at fault. This technique is related to how people see and perceive light, and various engineering skills are used in this regard. ±yor. Even today we benefit from the improvements that JPEG provides. People even compare things to JPEG, like “ChatGPT is a blurry JPEG of the web.” In this article I will explain all the interesting things that happen when you save or load a JPEG image. If you don’t know how JPEG works, let’s start by talking about how people perceive light.
The Relationship Between Human Perception and Information Processing
When we use computers and technology we rely on our physical senses to interact with them. For example, we use our hands to type on the keyboard, move the mouse, or touch the tablet or phone screen. Our sense of hearing allows us to hear sounds such as notifications from our devices or during video calls. Our eyes help us see things like text, images or video on the screen.
All these ways of interacting with technology have dramatically changed the way we use and produce new technologies. However, what is truly surprising is that we have designed interfaces that facilitate the use of computers with the unique working principle of our senses. By understanding how our senses work, we find effective and user-friendly ways to interact with technology.
We also explore the limits of human perception. For example, our eyes may detect that a video is not refreshing fast enough, giving the impression that the picture is torn or fragmented. However, science has determined which image refresh rate is considered adequate for different types of computer monitors and viewing distances. Typically 30-60 frames per second (FPS) is enough for most people not to notice tearing.
Brightness is another measurable aspect of visual perception, measured in nits or candelas per square meter. Since candela means candle in Latin, candela is the brightness of an average candle and when combined with square meter represents the intensity of light spread over a surface. For example, the maximum brightness of an iPhone 15 is determined as 1000 nits, 1600 nits (HDR) and 2000 nits (outdoor).
Understanding these limits of human visual perception allows us to effectively compress images without significant loss in perceived quality. lmasÄ It helps him. JPEG, a widely used image compression format, is also this type of lossy compression. We call it lossy compression because it deliberately removes certain information from the image to achieve a higher compression ratio while minimizing the impact on visual perception. It means that it was thrown in a calculated way.
Of course, there are different types of image formats used to store images on computers. One of these formats is the PNG format, images in this format are saved losslessly. However, this also makes the file size of the image larger than other formats.
For example, if we have an image with dimensions of 2592 x 1944 pixels and save it in PNG format, it will take up approximately 15 megabytes of storage space. On the other hand, if we save the same image in JPEG format, it only takes up about 0.75 megabytes, which is roughly 20 times smaller. The difference in file size is significant, but visually it is difficult for the human eye to notice any loss of quality in a JPEG image compared to a PNG image.
JPEG was standardized in the early 1990s because the BMP format, developed by Microsoft, was a necessity because it produced relatively large image files. It had become an age. Computers at the time had limitations in storing, loading, and transferring such large amounts of data, especially considering the early days of the Web. Therefore, JPEG provided a solution that allowed images to be compressed and stored using fewer bits while preserving visual quality.
How does JPEG work?
The main purpose of the JPEG compression format is to reduce the file size by removing unnecessary information. This process is called lossy compression because some data is lost during compression. The question we need to ask is what information can be safely discarded without causing a noticeable decrease in quality. Now it’s interactive time, let’s see. In the image below, there are tiles marked A and B. Can you tell me what color these tiles are?
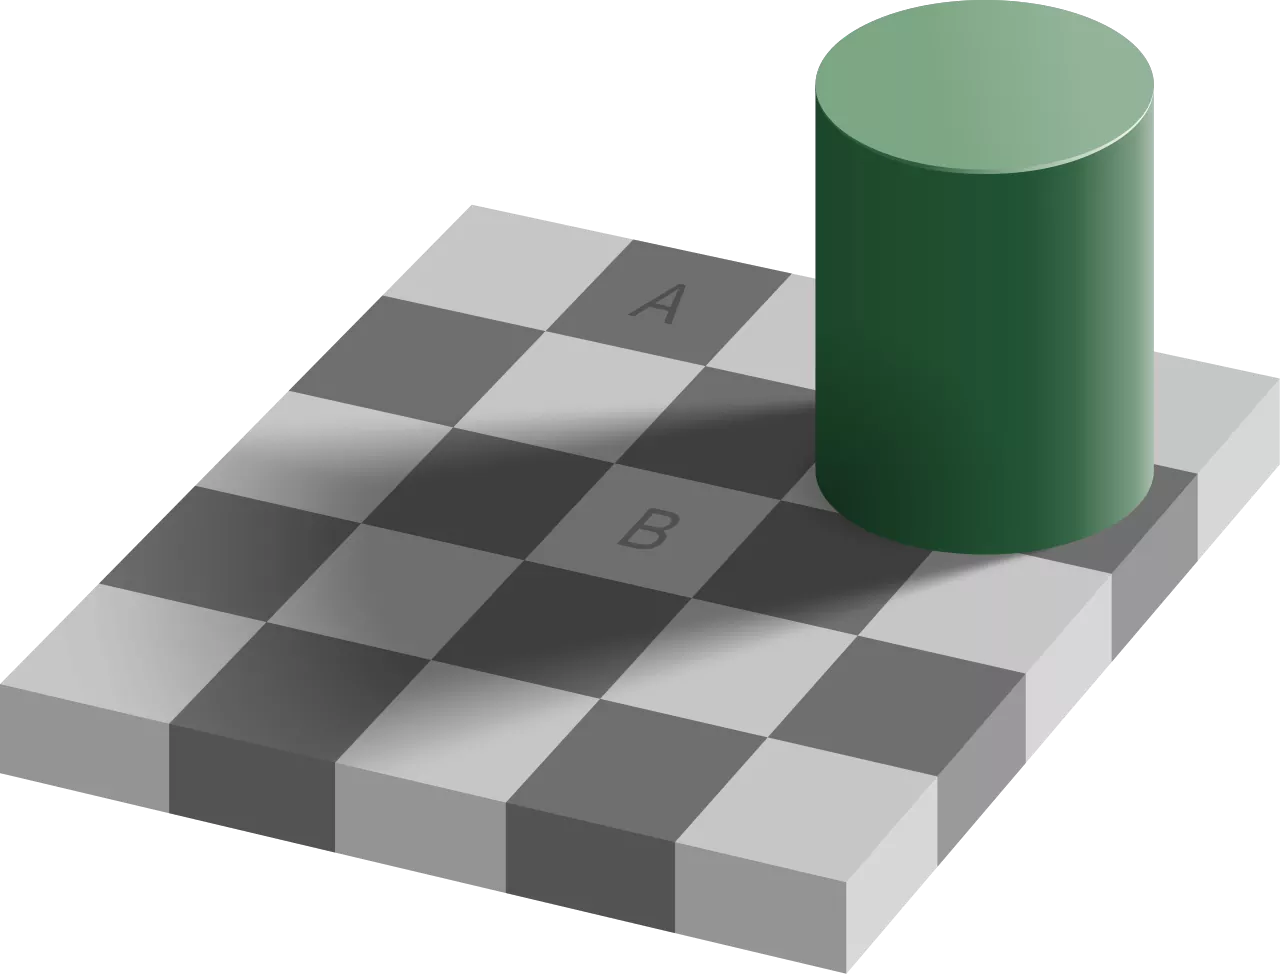
It may seem correct for your answer to be “B is gray but A is a darker shade,” but these two tiles are actually the same color. Scientists have discovered that our eyes are more sensitive to differences in brightness than to differences in color. This sensitivity to brightness is important because it plays a big role in JPEG compression technique.
Understanding YCbCr
Images consist of tiny dots called pixels, and each pixel is encoded with three values: red, green and blue, known simply as the RGB format. By using a mixture of these three primary colors you can achieve almost any other perceptible color, and the human eye is also good at detecting and interpreting these color spectrums. If we are going to use 8 bits (i.e. 1 byte) to represent each color, it means we need 24 bits per pixel to encode the color.
With this logic, we can obtain more than 16 million colors in one pixel. To choose how much red color a pixel has, we choose a number between 0 and 255. The higher the number, the brighter the red becomes. In this system, (0, 0, 0) represents black and (255, 255, 255) represents white. We can create a wide range of colors by using different values for red, green and blue.
The RGB color format is widely used to describe colors digitally. However, when it comes to compressing images, we can benefit from the fact that the human eye is more sensitive to brightness. This is where the YCbCr format comes into play. The YCbCr format also consists of three numbers but captures different information. “Y” represents brightness or lumens. It tells us how bright a pixel is. “Cb” means chroma blue and “Cr” means chroma red. These two components store color information. You may be wondering what happened to the color green, in fact it’s still in play. In the YCbCr format, chroma blue describes the ratio or contrast between green and blue in a pixel, while chroma red defines the ratio or contrast between red and green. mlar. So we didn’t lose any color information.
Step 1 – Color Subsampling
Color subsampling is a technique used in the JPEG standard to reduce the amount of color information in an image or video. It is optional and helps reduce file size without significantly affecting the overall quality. To perform color subsampling, you divide the image into blocks of pixels, usually 8×8 pixels. You then extract the color components (Cb and Cr) from these blocks. Instead of storing all the color information for each pixel, you group them into subgroups of 2×2 pixels.
There are different levels of color subsampling. For images, half of the color information can be discarded, while for videos and the MPEG compression format, a quarter of the color information is discarded. To determine the color of each subgroup, you can average the 2×2 pixels and apply that average to each pixel, or select the color of the top left pixel and use it for the other three pixels in the subgroup.
We started with the inner channel (Y, Cb, and Cr), kept the information constant in one channel (luminance component, Y), and discarded half of the information in the other two channels (Cb and Cr). So instead of three channels, we now actually have two channels, which means 66% of the original picture. If we had been more aggressive in sampling, that is, if we had used 4×4 blocks, we would have thrown away three-quarters of the information. In this case, with our luminance channel full, we would only have a quarter of the information for each of the color channels. This is 1 + ¼ + ¼ = 1.5 channels, that is, 50% of the original image.
Step 2 – Charting Data
We can say that what we mean by graphing data is trying to understand an image in terms of its colors and patterns. To do this, we can think of the image as a signal. Imagine taking a series of pixels from the image and plotting their color values. We said that each pixel has a value between 0 and 255, representing its brightness or intensity.
By visualizing these pixel values as points on a graph, we can get an idea of how colors change across that graph. Just as sound waves have different frequencies that determine their pitch, images have different frequencies that contribute to their appearance. Converting the image into the frequency domain allows us to analyze these frequencies and more effectively understand the patterns and colors found in the image.
By looking at the graph, we can define the fast change between pixels as a high frequency signal, and the slow change between pixels as a low frequency signal. Classifying signals as high or low frequency allows us to benefit from another human perceptual phenomenon. Human visual perception is less sensitive to high-frequency pixels. That’s why we need to get rid of high frequency pixels.
Step 3 – Discrete Cosine Transform (DCT)
To understand the concept of discrete cosine transform (DCT) in simple terms, let’s imagine that we have an image consisting of small squares called pixels. Each pixel has a specific color or brightness value. Now, instead of looking at the image in terms of individual pixel values, we want to analyze it in a different way. We want to split the image into a combination of different patterns or waves. These waves are called cosine waves because they have a special shape that resembles the cosine function.
DCT helps us achieve this conversion from pixel values to cosine waves. It does this using three important parameters: frequency, amplitude and drift. Frequency tells us how often the pixel values in the image change. Amplitude represents the power or weight of a particular cosine wave. Shift allows us to adjust the brightness of the picture.
Using these parameters, DCT allows us to view the image from a different perspective, known as the cosine space. This perspective has some nice mathematical properties that make it useful for compression. One of its most important features is spectral compression. It allows us to see the picture efficiently by bringing together information about lower frequencies, which are more important to our eyes, and separating them from higher frequencies.
Although there are other good conversions that can work for image compression, DCT is great for JPEG because it is efficient and has open patents. It was widely adopted. Many other schemes were patented at IBM, so DCT’s open patent played an important role in its inclusion in the JPEG standard. We calculate the coefficients to apply DCT to the 8×8 pixel block. These coefficients show how much each cosine wave affects the entire block. In other words, we observe an 8×8 block using the combination of 64 cosine waves.
Step 4 – Quantization
Quantization is the process of simplifying a large set of values by matching them with a smaller set of values through rounding and scaling. To make an analogy, it is like rounding the price of a product to the nearest lira instead of focusing on pennies. In the context of JPEG, quantization helps reduce the amount of high-frequency information while preserving low-frequency information. It is obtained by dividing each element in the 8×8 pixel block we just mentioned by a corresponding value from the quantization table and rounding to the nearest integer. The quantization table consists of different matrices that determine the level of compression applied to the image.

Quantization can be applied to both the luma (brightness) and chroma (color) components of the image. However, the quantization tables used for chroma are generally more draconian. This is because our eyes are more sensitive to changes in brightness, so we want to preserve the luma component as much as possible. We can still apply some quantization to chroma without causing too much perceptual loss. If you’re interested in seeing the impact of quantization on image quality, we also have a simulator that lets you play with different quantization settings and observe the resulting image quality. here Let me note it.
Step 5 – Number Length and Huffman Coding
Many values in a quantized DCT matrix become zero. This creates the opportunity to encode the remaining non-zero values more efficiently using a technique called run length coding. The idea behind digit length encoding is to represent a long sequence of numbers by counting how often the same number appears consecutively. This technique takes advantage of the fact that long strings of zeros are often found in quantized DCT; This means there is sequential redundancy.
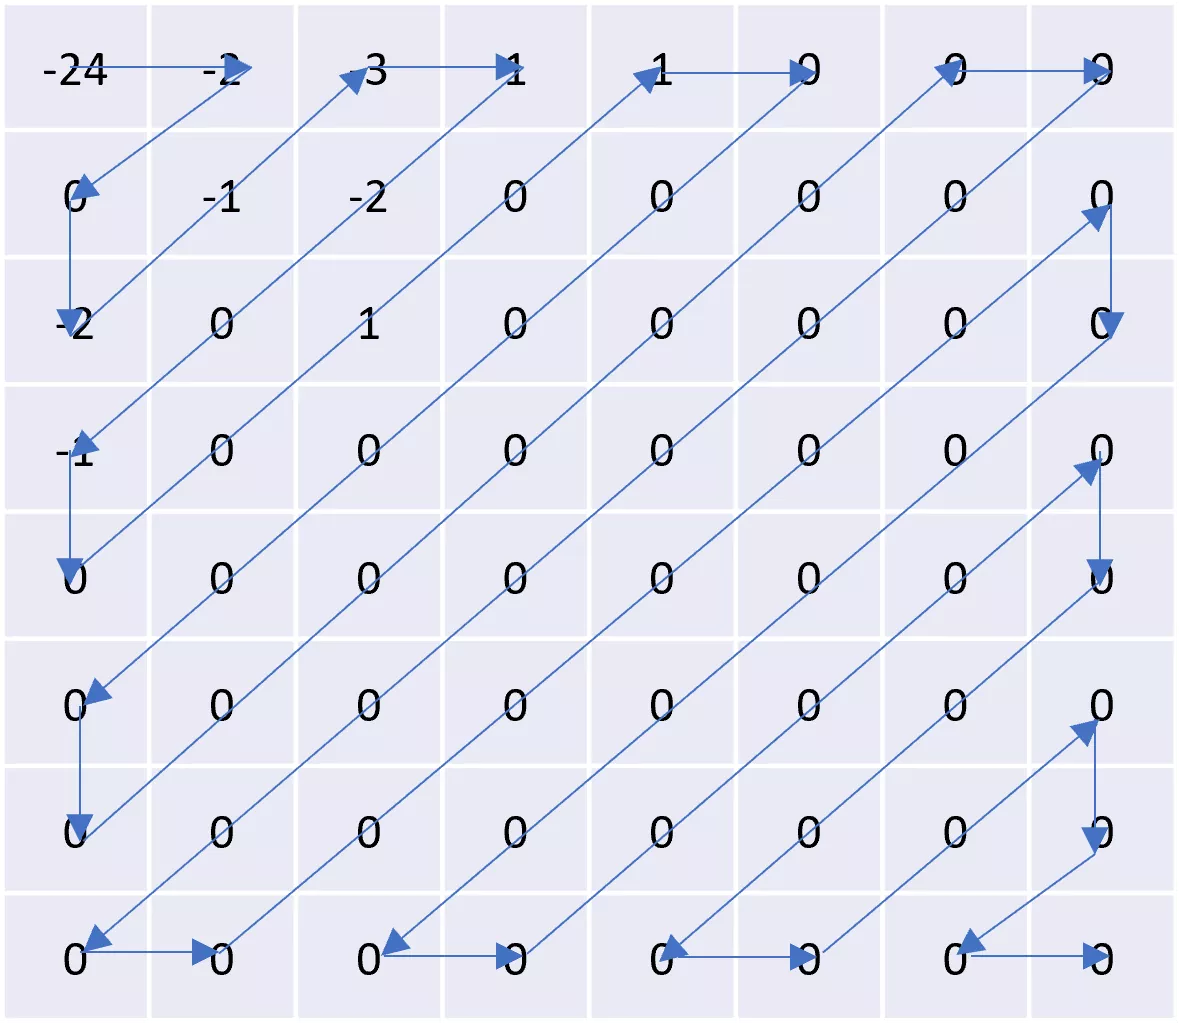
To implement run length encoding in the JPEG algorithm, the digits in the quantized DCT are arranged in a zigzag pattern. This arrangement maximizes the number of zeros at the end of the row, allowing them to be effectively identified and compressed. It makes it easier. Now you can see that the above table creates a sequence of numbers like this.
-24, -2, 0, -2, -1, -3, 1, -2, 0, -1, 0, 0, 1, 0, 1, 0, 0, 0, 0, 0, 0, 0 , 0, 0, 0, 0, 0, 0, 0, 0, 0, 0, 0, 0, 0, 0, 0, 0, 0, 0, 0, 0, 0, 0, 0, 0, 0 , 0, 0, 0, 0, 0, 0, 0, 0, 0, 0, 0, 0, 0, 0, 0, 0, 0
We can make it more compact by compressing the repetition of zero in this number sequence. Then we see that the number sequence we obtain can store 17 values instead of storing 64 values for an 8×8 pixel block.
{ -24, -2, 0, -2, -1, -3, 1, -2, 0, -1, 0, 0, 1, 0, 1, (0, 49) }
This was just one way to prevent number repetition, another technique is known as Huffman Coding. Instead of representing each number separately, Huffman Coding groups them into groups of three. Each trio consists of three parts:
- The number of zeros before a value
- Number of bits required to encode the value
- The real value itself
By doing this, common triples can be represented more efficiently using fewer bits. For example, a string of eight zeros may be represented by a single character such as “A,” while a less frequently occurring pattern may be encoded as is. This way common patterns are compressed more effectively, ultimately reducing the overall file size.
More than 77% of all websites use the JPEG standard to compress images. The reason for this is JPEG’s ability to shrink image files without any visible loss of quality to the human eye. Although newer formats such as WebP or AVIF have recently gained popularity with better compression ratios, none have surpassed JPEG in terms of widespread use and adoption. didn’t suck.
Despite the advent of these modern formats, I still appreciate the significant advances JPEG has made over the last three decades. It can be considered an impressive achievement, both in terms of engineering and in terms of how it is perceived by people. JPEG has become widely known and used in everyday language even by those who are far from computers, making it a truly remarkable algorithm that will be remembered for a long time.